Saturday 30 January 2016

Balloon Builder Birthday

I am loving the two balloon sets in the Spring Summer catalogue and can't decide if I have a favourite.

 This is the Balloon Builder set and I used it for this quick and simple birthday card that I needed in a hurry.

The mix of sizes in the balloon make it easy to quickly build the image you want and stamping repeatedly without re-inking  the stamp allows for the depth and shade variations.

I stamped this onto shimmery card for the extra sheen, using strawberry slush ink and then used a darker mat underneath.

For the sentiment greeting I used the Happy Birthday, Everyone stamp set.

That its for now.. until next time

Cxx

Tuesday 19 January 2016

In the Meadow

In recent years I have become a huge fan of the nature inspired stamp sets with animals and scenery. I still have every one I bought  even after some retired because I continue to use them often.

  In the Meadow is another lovely addition to my collection and this morning I have been playing around with this set.

The first thing I did was stamped and fussy cut each image to use  as a mask in scene building. I keep these tacked to the case lid with the stamps so they are ready when I need them.


For the first sample (above) I triple stamped the mountains and kept the rest of the scene as grassland with the saplings and deer in the foreground.

In the second sample (left) I used the same basic layout but added some pale water and edged it with sand  to make a divide between the grassland in the foreground and the mountains in the background.

In both samples I used darker shading on the closest range of mountains and lighter on the farthest most range to accentuate distance.


For my final sample I decided to try stamping on a piece of linen card I had sitting on my desk form another project. The linen texture card gives a whole difference result - especially in terms of how the card takes the colour. The lines of the stamped images are  much more defined too.

On this sample I changed the scenery composition slightly and added more water.

This was just my first attempts at playing around with this set. I already have in mind to use the scenery to build a scene for the 'airplane' from The Sky's the Limit  SAB stamp set...but that is for another day.

Until next time, take care
Cxx

Saturday 16 January 2016

Rose Wonder

I thought I would just share with you a few cards I have made with this set. For each of the cards I have used the same basic design but wanted to show the very different results you can get...


A couple of days ago I shared this one... where I stamped and  then coloured the image and added the die cut overlay over the top which gives a raised  dimension detail to the card.


Now on this one I stamped the image in black ink. I then very roughly coloured using watercolour crayons. Once I had the basic outline colours down , I gave the image a quick spritz with water and gently blended the colours out across the whole image.


For this next card I  took an off cut piece of very vanilla card and then I die cut the rose and leaves from plain white card and used it as a stencil. I sprayed the colour through the stencil and once it was dry I lifted the die cut overlay and set aside.  I fussy cut the stamped and stencilled image and adhered it to the front of a diagonally cut card base. I cut another piece of very vanilla card, stamped the sentiment in the top corner, inked the edges with a sponge and adhered it to the inside of the blackberry bliss card base.


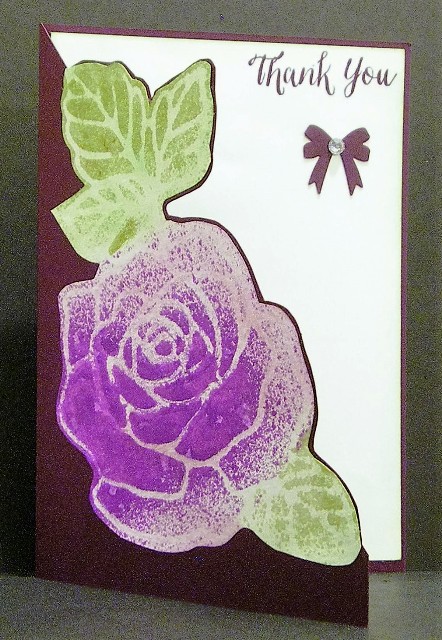
And finally, in the spirit of not wanting to waste anything tyat can be used on a project , I took the die cut that I used as a stencil and adhered it to the front of a card and added an embossed sentiment to the top corner. I added a few dots with a versamark pen and clear embossed those in the space to complete this very simple Thank you card


The thing that impresses me so much about this bundled set is that I have only used one floral stamped image and one die from the set and there are so many more  in each...and I haven't even begun to cut into the die cuts and develop the cards that way. There are just so many possibilities with this set and I really think my husband made a brilliant choice with this one.

There are sure to be more of these to follow. Until next time, take care
Cxx

Thursday 14 January 2016

The Sky's the Limit

Today I thought I would share the sale-a-bration freebie my husband chose for me. This one is a limited time product and only available until the 15th February , so if you want it, please don't miss out.

The vintage plane is a great image and really easy to cut out...all the fiddly detail is inside!

I needed to make this card really quickly and so grabbed  a retired embossing folder (sorry, no longer available oops!)  but the stamp set does come with cloud stamps and I will do other cards using this set  with a variety of background options.

There are some great wording stamps with this set and the fonts are really classy. As this was a birthday card and I want the recipient to have an exhilarating day, I adhered one of the planes upside down.... They loved it.

More soon... until next time,

Cxx

Tuesday 12 January 2016

New Year, new catalogue, time to sale-a-brate

Life got in the way of creativity last year, but now we have a New Year and a fresh page to fill every day... and I plan to make the most of it.

As demonstrators we get to preorder  goodies before any new catalogue is released, but this time round circumstances had me waiting like everyone else...but my first lot of goodies came on Friday and I have been busy setting up my stamps and trying them all out.

I found it seriously hard to choose what  to buy and so I decided I  would let my husband pick for me.  To be honest I knew it wasn't that much of a risk because all the Stampin' Up! products are great and he has great taste anyway.

My first card shows that he chose the Rose Wonder stamp set bundled with the framelits. His reasons for this choice .. the pretty images and versatility of the matching dies and also the great sentiments that come with the set. For this card I stamped the rose and leaves by adding ink direct to stamp with my markers and then coloured them using ink and blender pen. I really liked the image as it was  when I stamped and coloured it, but of course I wanted to try the framelits too and so I cut the rose and leaves from a pearlescent cream card to compliment my very vanilla base card and adhered it over the top of the stamped image...and of course I loved that too.  Although the Rose Wonder set comes with lots of wonderful sentiments, he had also chosen the botanicals for you stamp set as one of the sale-a-bration freebies on my order and I was keen to try this out too. The finishing touches were the green and cream enamel dots left over from my Christmas crafting.

I enjoyed my first play with my new goodies and so far my husband has done a great job... What else did he order for me? That is for another post...

Until then, take care
Cxx