Monday 7 November 2016

On Stage Fun

On Friday I travelled up to Telford with a member of my team to attend the On Stage local event...400 hundred Stampin' Up! demonstrators gathered in the Telford International Centre for a packed event filled with fun.

As always swapping is huge part of any Stampin' Up! event and now that it is over and they have all been swapped  I can share my swap projects ...

I am not a huge fan of production line crafting and so I opted  to make smaller batches in four different designs....all but one involved me getting very inky indeed!

This one proved the most popular and very quickly all of this design were swapped. I used three stamp sets on this shortfall card. Country Livin' for the guitar and boots (which were fussy cut and adhered to the wall) , Hardwood background stamp was used on crumb cake card before I ran it through the big shot in the brick wall embossing folder and finally Vertical Greetings for the Happy Birthday sentiment

Real red, crushed curry  and crumb cake card were used along with crumb cake and chocolate chip ink


 For this simple card I used Love & Affection stamp set with crumb cake and dapper denim cardstock and ink.

I randomly stamped five of the images from the set to make up the patterned background. I also stamped and fussy cut the single flower for the sentiment panels.

By the time I was finished my hands and nails were blue... good job the ink comes off with soap and water!


For this bright card I used one of  the fabulous seasonal decorative masks from the autumn/ winter seasonal catalogue. There are four very different designs in the set and they are such great value and so versatile.

I used whisper white card stock and started by sponging the half circle. Then using a  sponge I added crushed curry ink through the mask.

For the butterfly I used the same mask on a separate sheet of card and this time I used all of the most recent in-colours. Then I stamped the butterfly from the Papillion Pot Pourri set in black ink over the top, punched it out, curled the wings slightly with my bone folder and used a glue dot to fix it to the card front.

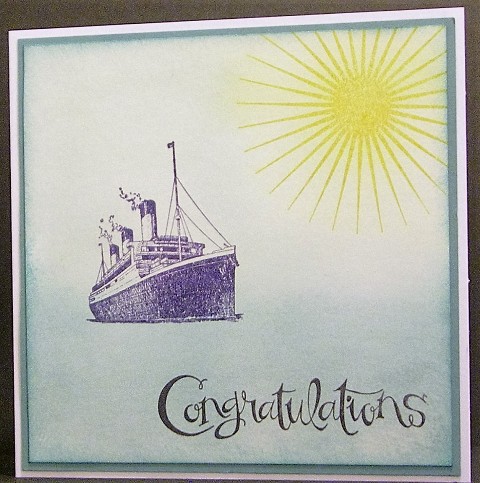
I used tempting turquoise for the card base and dapper denim for the mat for the stamped panel. The sentiment is from Happy Happenings and some rhinestones finished the card.


My final card was more die cutting than stamping. I used the detailed floral thinlits die to cut the design out of a whisper white panel and I adhered this to my peekaboo peach base card.
Using the same colour ink, I stamped the random splashes from Awesomely Artistic across the card and I used the bold butterfly thinlits to cut white butterflies to add where they met. I finished it off with a coordinating heart enamel accent. The sentiment is one of my absolute favourites and is from the Bunch Of Blossoms stamp set.


I plan to take photos of the gorgeous swaps I received in return and will share them very soon.
Until next time, Take care
Cxx


Wednesday 28 September 2016

C&S Birthday


A very clean and simple card for a child's birthday using balloon builders stamp set and punch, layered letters stamp set to make up her name, along with birthday wording and banner from the Hostess set Time of Year.

Layered Letters is particularly useful when personalising a card with a name and I was very pleased with how this turned out.

Until next time
Cxx

Sunday 25 September 2016

Marquee Messages


As soon as I saw the Marquee Messages set in the catalogue I knew I had to have it...and I love it. It has a good selection of wording options and works well with other sets too making it so versatile. Here I have also used the labeler alphabet set (and the Happy Birthday is from a retired set that I love and still use often...)

For this particular card I initially kept to black and red for the stamping. The I went back in and I used the gold marker pen (which I have just realised seems to have retired when I was not looking ...oops! Mine is still good and I am going to keep using it) and also some dazzling details to add some bling to the design... and then when all that was dry I decided to go back again and stamp some stars into the white space and for that I used crushed curry ink to finish things off ..and I was done! .
Until next time
Cxx

Wednesday 21 September 2016

Floral Phrases Anniversary card


I needed to make a card for my brother and his wife for their anniversary this month and I had just taken delivery of this lovely set (with thinlits)  and in minutes I had this very pretty card.

As I was clearing away the little cut outs from the die I spotted the teeny flowers and decided to add them rather than waste them...and I am so glad I did because I really like the way they look. I used a couple of basic pearls in the cut out design and added two hearts from the  in colour enamel shapes pack to finish off the card. I was pleased with the end result.
Until next time
Cxx

Sunday 4 September 2016

The Autumn Winter Seasonal Catalogue is here

In the unlikely event that you missed it, the new Autumn Winter Catalogue has launched and it is filled with great new products to help with all your seasonal crafting... If you don't have a copy and would like one please let me know via the link on my demonstrator website and I will getone in the post too you straight away.

This 55 page catalogue has a fabulous range of new products to suit all tastes and there are lots of bundles where you can save a little money on coordinating products.

Now I will admit I am really not a fan of seeing Christmas cards in summertime but I took part in a team swap this week using products from the new catalogue and so I'm afraid I am about to break my own rule and share a Christmas card... in the first week of September...

For this card I used the gorgeous Merry Medley background stamp (on page 30) and I stamped it onto real red cardstock using versamark and then added clear embossing powder to give it that tone on tone effect. I was really pleased with how crisp the image was and how lush the card felt.

I also embossed the tree using the same method (onto cucumber crush card) and I used an assortment of the metallic threads to wrap the tree. Swirly scribbles thinlits were used to cut the gold  glimmer paper  and I cut the wonky stars from scrap glimmer paper by hand for the top of the tree

I was really pleased with how bright and festive this looked and how good it feels to touch. There are lots of options when using this background stamp and I will highlight some others in weeks to come, but for now I will sign off and get back into my craftroom...I have new goodies to play with

Until next time, take care
Cxx

Friday 15 July 2016

Perfect Day to be Happy


I really like making these double z fold cards - they are so simple to make and work so well with any number of stamp sets and designs. I made this card to send to a swap buddy and I used the new Foxy Friends stamp set along with the sentiment from the new bunch of blossoms set. I was really pleased with how this came out and how cute and fresh it looks. I hope that it will truly be a smile in an envelope for my swap buddy.
Until next time
Cxx

Monday 11 July 2016

Quick & Easy with Layered Letters


I have to say I just love this alphabet stamp. It is just perfect for quick an easy cards or when you need to personalise or highlight a message and simply by choosing the right colour combo it works equally well for boys and girls of all ages.

In this particular card I simply chose two colours for my base circles and used archival black ink over the top, The set has circles or oblongs and both fit the letters perfectly and can be linked or stamped separately depending on the project needs.

I have some ideas for some slightly more involved projects using this set so watch out for them soon, but for quick and easy cards, you can't beat layered letters. .
Until next time
Cxx

Friday 8 July 2016

Mixed Borders


 I recently took part in a team swap to highlight some of the fabulous products in the 2016-17 annual catalogue.  With so many to chose form it was hard to decide which set I was going to use but in the end I opted for Mixed Borders.

I will admit that when I first looked through the catalogue I initially overlooked this little gem, but a second look and I saw the real potential. It comes with a number of  really useful sentiments and the best part is that they fit right into the gap on the border stamps....and lots of other sentiments/wording options can fit there too.  Of course with the stamps being photopolymer it is really easy to see to line them up if you need to extend the length of the border or repeat a pattern. In addition to the border stamps and sentiments there are some other elements that allow you to stamp background patterns, making this a very versatile set indeed.

For the purpose of this swap I chose to make a double z fold card and to work with the new 2016-18 in-colours                                                                                                           In the main photo I used flirty flamingo with the floral border option. For the card on the right I used the same stamp options but in peekaboo peach.                             
           
                             
For the card on the left I opted for emerald envy and used the leaf border and accessories, with the dotted border in between in a complimentary colour.

For all of the cards I used the  matching element stamps in the same colour as the base card to create the background patterns for the front folds and the z fold panel strip and the punched butterfly.


I finished it off with a wink of Stella  and some basic pearls on the butterfly for that added bit of bling.

Well that's it for now. Until next time
Cxx


Thursday 23 June 2016

Thinking of You


This was a cute card I made for a friend to cheer her as she deals with some health issues. I used the swirly scribbles dies and the oh so cute frog from the Love you Lots stamp set (which is a Hostess set available with a qualifying order.)

My friend loved her card and it is so nice to be able to send a smile and a hug in an envelope. If you know someone who could use a smile or a hug (or both) why not make and send them a card today... it  could just make their day...

Until next time
Cxx

Friday 17 June 2016

Marquee Messages - simple


Very quick and simple card today made using the new Marquee Messages stamp set. This set has so many possibilities and I have seen some lovely examples, but I needed to make a card in a hurry and this was the end result. For the background and the focal image I used only the stamps in the set onto the base card and then I stamped another image onto green card and cut that out and popped it up on dimensionals to give it a little depth. I added a little glitter as a finishing touch and it was good to go... I will be using this set a lot in the coming months and will share some of the other options it provides.
But for now this is it...
Take care
Cxx


Friday 10 June 2016

Time of Year- Birthday


I have been so busy playing around with my newly delivered goodies from the new catalogue  and then I got a call to ask me if I could make a quick birthday card for a male recipient.... and as the new hostess set Time of Year was sitting on my desk it seemed silly not to use it... I only had a few minutes to make this card and so I quickly stamped the wording using dapper denim ink (my new favourite colour)  and I ink edged the edges of the panel with my sponge but I felt it needed a little something to brighten it up...so the next set on my desk was the new mixed borders and I realised I could  easily use that set to make a border around my wording (it comes with its own wording options too so it was a bonus that I could use it here too). I chose a red shade to lift it and then I spotted some of my retired designer series paper that would work perfectly... and within minutes was card was done, addressed and on its way...

While it is lovely to be able to spend a long time carefully designing and building a beautiful card with lots of details, sometimes it is just as much fun to rise the challenge and make something quickly that will still show someone that you remembered them...and of course if you don't tell them how long it took you, they won't know ...they will just be delighted that you made the effort to make something for them.

Until next time
Cxx

Saturday 4 June 2016

You are Totally Awesome


We all need to be told that we are awesome and I made this card for someone pretty special to do just that.

It uses two of the new in-colours (dapper denim & sweet sugarplum) the new swirly dies and the butterfly punches. I love the simplicity of this one and it says exactly what I need it to say...
Until next time
Cxx

PS.  My second batch of new catalogue goodies (first lot was on limited pre-order) are on their way to me as I type and I cannot wait to start using them. I am tracking delivery on line and they will be with me on Monday...so watch this space!

Tuesday 31 May 2016

Balloon Builder Birthday

Today I am sharing this birthday card and sending up some balloons in the new in-colours...

The new catalogue launch is just one day away and I am still adjusting my wish list ...and when I say adjusting I guess I mean growing , because there are so many wonderful things in this new catalogue it just so hard to choose what to get first.

Would love to know what is on your wish list... and please don't forget,  if you need a copy of the new catalogue please do drop me a line.

Until next time
Cxx


Thursday 26 May 2016

Rose Wonder in colour


I wanted to make a couple of cards to show off the fabulous new in-colours for 2016-2018...they are so pretty and I am already in love ...

It started with the idea of making five cards the same design but in each of the five new in-colours, only as I began making them, it sort of morphed into five cards on a general theme, each with a slight difference.

But you can still see the gorgeous colours...clockwise from the top left is Dapper Denim, then Peekaboo Peach, below that is Flirty Flamingo, then Emerald Envy and finally Sweet SugarPlum.

Each of these cards was made using Rose Garden Thinlits  with a combination of  sentiments and elements from other stamp sets. However I will be returning to the emerald envy version as this one was very different to the others and a lot of fun to make using the negative shape.

But that is for another day...this was just to highlight the gorgeous colours.
Until next time
Cxx

Sunday 22 May 2016

All Stacked up...


Today I was playing around in my craft room and decided to make this fun card for my niece's birthday. I used the Sprinkles of Life stamp set along with the new swirly scribbles thinlits from the upcoming new 2016 catalogue.

I used the thinlits to cut out two of the long swirly dies and I transferred the cutouts from the watermelon wonder card to infill the swirls I cut in mint macaron. One other thing I really love about this particular die, apart from the infill option, is that it leaves a gorgeous wavy cut on the card... and I used this at the bottom of my design and lined up the mint die cut against it.

There are 9 dies in the set and all of them provide versatile options. It also coordinates with the swirly bird stamp set too.

This was a fun card to make and while my initial aim was to showcase the stamp set,  I know there will lots more to come using these thinlits.

Until next time
Cxx

Wednesday 18 May 2016

Sunshine

Sun was  beating down for a few days last week and it seems to brighten everyone's mood, so when looking at Kinda Eclectic last evening I thought why not use it as a sun peeking over the greenery...maybe it will tempt the real sun out from  behind the rain clouds we have this week!

 I inked approx half the rays stamp and stamped it centrally and then stamped the green leaves many many times in first second and third generation stamping using mossy meadow ink (which is one of my favourites ever and I am sad it is retiring but have stocked up on reinker so will continue to use it as long as I can) until I had the level of coverage I was looking for. I sponged the sky and around the edges of the card. I decided for this card I preferred the butterflies from Papillon PotPourri and so stamped and punched those and added them to the card.  There is no sentiment as yet because this will go into my card box until I need it and I can add it later.

So a simple all occasions card from me for today... More soon.
Until next time
Cxx


Friday 13 May 2016

Sending Wishes your way


A very quick and simple card for today using elements from three stamp sets :- Butterfly Basics, Awesomely Artistic and Kinda Eclectic

 For this one I lightly sponged the entire square of whisper white card with dapper denim ink before stamping the fern along the left hand side. I stamped the dragonfly in dapper denim too and also stamped three more dragonfly images which I cut by hand and adhered one on top of the other, making sure to only glue the centre. I also stamped and punched two butterflies and added them with glue dots. A couple of basic pearls and  the card was ready for the sentiment.

It is a simple card and may not have taken long to make, but I was pleased with the overall effect. Sometimes less really is more.
Until next time
Cxx


Monday 9 May 2016

Mixing the "old" with the new


As promised a current stamp set,  but together with the new 2016-2018 in colours ... because I simply could not resist!

There is a lot more stamping on this card than it may first appear. The background started life as a piece of 13.5 cm square very vanilla card. I stamped the floral images in each corner using the new Emerald Envy and  I stamped the dragonfly between the two. Then I set about building up the colour by using sponges and Dapper Denim ink, which was overlaid with stamping using white craft ink and built up until I was happy with the final result. I coloured the floral aspect with the remaining in colour selection and used a blender pen to drag some of the green of the foliage. Once that was done I added a mat of dapper denim and adhered it to a scallop card base.

I stamped three additional dragonfly images and cut them with scissors and used Tombow glue to stack them, being careful to only glue the centre of each layer to allow the wings to be free. Once that was all dry I adhered it over the top of the original stamped dragonfly. I added a  wink of Stella to the flowers and pearls for centres and the card is done. I will add a sentiment later when I decide to send it.

That's it for now, until next time
Cxx

Saturday 7 May 2016

This is what kept me busy


I have been a bit sporadic at keeping up with my blog in the past year but have been seriously trying to maintain a minimum two posts per week ratio...and then just realised that I have not posted for almost a week!

The clue for the  reason behind this sudden lapse is in the photo... Yep! I got my hands on the new upcoming catalogue and some pre-order goodies.

Great excuse eh?

As demonstrators we are lucky enough to get the catalogue a few weeks before the official launch and we also get to pre-order from a selection of new products.

I am  already in love with the new 2016-2018 in-colours  (mind you I have never met a set of in-colours that I didn't like) and I can't wait to start using them....and I will use them.... just as soon as I can tear myself away from the new catalogue. It is fabulous!

 I have not slipped back into irregular  blogging habits, I just fell face first into the new catalogue!

But as catalogue launch is still a few weeks away, I am going to try to curb my new catty enthusiasm and between now and then I will concentrate on giving some attention to  stamps sets that are current right now and will be carrying over into the new catalogue.

Until next time
Cxx


Sunday 1 May 2016

Papillon Pot Pourri

Butterflies...I use them all the time and I had the embossed flower (from flower patch set) sitting on my desk for ages after I changed my mind about a card I was making ...but if its good I don't throw it out and eventually the flower came into its own...

For this one I cut the yellow card at 14 x 14cm and I cut the green card at 14 x 11cm. On the reverse of the green card I drew a wavy line freehand and I cut this with a pair of scissors before running both halves through the embossing folder.

The two green sections were adhered to the yellow mat to form the base for the card. I stamped and punched the three butterflies out of the same yellow card and die cut the flower using the matching framelits..

I used  glue dots to adhere the butterflies and topped them with basic rhinestones. For the flower I cut a length of the silver thread and held it in place with a dimensional and then looped it three times before securing with another dimensional. I popped a rhinestone in the centre of the flower to finish.

Until next time, take care.
Cxx

Thursday 28 April 2016

Just for you

I have been very busy this past week trying to organise my craftroom and its an even bigger job than I initially thought...but I still have to find time to make something and this was one of the cards that I made yesterday.

Its a very simple vanilla background onto a honey card base. I used the soon to be retiring in-colours for the wording and the flowery elements and I cut and punched the butterflies to complete the card...

And then I decided it needed a bit more sparkle so I reached for the wink of Stella brush and added subtle sparkles to the Just for You and the butterflies and it did the trick.

This card is on its way to a crafting pal this week as part of a swap. I hope she likes it.

Until next time
Cxx

Saturday 23 April 2016

Work of Art

This is still one of my favourite stamp sets and I was thrilled to see it does not appear on the retiring list.

This card is for a friend overseas and she loves bright colours and bold patterns and this seemed the perfect set to use for a card just to let her know she is amazing..because let's face it, we could all do with hearing that more often, right?

I concentrated on using the out going 2014-16  in-colours for this card. I am certainly going to miss these colours, they have been among my favourites ever.... but as one set leaves, another comes along and I am pretty sure I will be raving about the newest in-colours as soon as I get my hands on them.

Until next time
Cxx

Wednesday 20 April 2016

Traveller

I made this card to celebrate a dear friend who recently reached a career milestone in her cruise planning business and what better stamp set to use than the Traveller

I started out with the sunshine stamp from Kinda Eclectic  and then I blended Lost Lagoon and Bermuda Bay ink for the ocean and soft sky (for the sky obviously). When I came to stamp the ship I couldn't make up my mind if I wanted to stamp it in black or in blue and so I dithered and added both to the stamp...resulting a rather vivid school ink blue which I could never recreate in a millions years!

The Congratulations came from from Sassy Salutations and finished the card which was mat onto Lost Lagoon card to frame it off.

Three much loved but recently rather neglected stamp sets used in this one...it has been a joy revisiting old favourites...so I won't stop now. More to follow.
Until next time
Cxx

Sunday 17 April 2016

Amazing BIrthday


Throughout this week I shall be continuing to show some love for some old favourites and today is the turn of Amazing Birthday and Perfect Pennants stamp sets.
I have used these sets a lot  in the past and so decided to try to do something different from the cards I have made before and I came up with two designs using the latest in-colours.

For the first one I used the brick wall embossing folder but I ran in through the machine twice, turning the paper for the second run to get a random geometric pattern for my background. I used the tag punch to make a detachable bookmark using the Perfect Pennants stamp set (because I love a card that is more than a card) and layered up the little elements using dimensionals to give extra depth.


On the second card I randomly stamped the  circles and stars with cucumber crush ink onto cucumber crush cardstock  and heat embossed it with clear embossing powder. I then went oin with the same ink and the random splash stamp (from Awesomely Artistic set) to fill in the gaps.

I stamped the striped banner and  the happy birthday stack and layered them up on dimensionals.

The word window punch was used  for the strap and I stamped and punched the cake and popped it on dimensionals too.  Three enamel accents finished this off.

I was happy that even use the same colours,  I managed to make two very different designs.

Look out for more old favourites throughout the rest of the week.
Until next time, take care
Cxx

Sunday 10 April 2016

Hello friend


This was one of those cards that sort of emerged as I worked. I knew I wanted to use the hexagon stamp set but other than that it was a very organic process.

I have seen some lovely cards made with this set and a couple of strips of washi tape or a banner but they were A6 size and I wanted to work in 6x6 format. The patterns just did not work on the larger square.

 I decided I would use the 2014-16 in-colours (they will retire this summer so if you don't have them yet, get them now - they are fabulous!) and stamped a variety of hexagons and set them aside... while I started out with Gorgeous Grunge stamp set on glossy card using two colours to make the background. Once I had finished the splatter I added a line of blackberry bliss and sponged Blackberry bliss ink around the edges of the card before matting it onto a mossy meadow card.

The I began arranging my hexagons, ensuring there was at least one of each of the in-colours in the design...finally deciding on the arrangement you see in the photo. I adhered them to the base and the centre hexagon I popped up on dimensionals.

To finish the card I added a bow of silver thread and a layered stamped butterfly with rhinestones.

I was quite happy with the end result and delighted to have used a couple of sets I have not touched in a while. It has been great fun working with old favourites and I must do it more often...especially since I know when the new catalogue launches this summer I will be busy with new product offerings.

Until next time,
Cxx


Wednesday 6 April 2016

Choose Happiness

Choose Happiness was one of those stamps sets that I loved at first sight and I used it a lot when I first had it...I found it perfect for making embossed backgrounds and I love all the elements that you can layer up to add dimension and interest. Its another set that would work perfectly with just about any sentiment or for any occasion.                                                            

For this card I deliberately steered clear of heat embossing and decided to try it with a fair amount of white space....which I filled slightly with a pale ink and a random splash stamp (from Awesomely Artistically set - another of my all time favourites) After I took this picture I added a wink of stella brush to the flower and butterfly for that extra little sparkle.                                             

With no real design plan in my head before I began, I was quite happy with how it turned out. 
Until next time                                                       
Cxx

Tuesday 5 April 2016

Work of Art

Still trying to show some love to some old favourites, but recently rather neglected stamps... and this one is one "Work of Art" is one of my all time favourite stamp sets because it is so easy to make a card in just a few minutes.

For this one I used the 2015-17 in-colours because I realised there are some shades I have not used as much as others and I wanted to give them equal attention..after all they are selected because they work so well together and it seems rude to to take advantage of the planning that went into them,

The card is simple, bright and fun and I am so pleased I   dusted off this one too.

Until next time,
Cxx

Saturday 2 April 2016

Old favourites

I have just returned from a lovely trip to the USA  - which I never announce because lets face it, we don't need to encourage burglars by giving them prior notice! The trip was everything we hoped it would be and now I am back with renewed energy.


Earlier today our team was challenged to take a neglected stamp set and show it some love by making a card or project... Oh the shame when I walked into my craft room and was able to grab a pile of stamps that I have not used in ages...but that all changes right now.

The first one I made was using Kinda Eclectic stamp set, which I adored when it first came out and used loads, but has sat unloved on the shelf for a while now.

 I used almost all of the stamps in the set for this one and as soon as I started using it I remembered why I loved it so much. It is a really versatile set and allows lots of options for all manner of occasions and can be paired with just about any sentiment from any set.

 This card will be going to a friend next week and there will be more neglected stamp projects to follow in the next little while.

Until next time,
Cxx

Wednesday 17 February 2016

Hello

Sometimes I simply need a card that says Hello...

I used the Grateful Bunch stamp set and punch to make this card.The punch makes easy work of building up the flowers.

I just love the butterfly that comes with this stamp set, the image is so delicate and detailed and just the right size for using markers direct to stamp to get a two toned effect.

I went completely off my usual colour palette for this one and used pink and orange shades together for the butterflies and the flowers, but I think it worked just fine. Sometimes you just have to let go and see what happens.

Until next time

Cxx


Tuesday 9 February 2016

Get well card

A friend is in hospital and  I wanted to send her something pretty and cheery and so I opted to use Rose Wonder stamp set and the floating re-inker technique.

So I stamped the rose and leaves using versamark embossing ink and I heat embossed using white embossing powder. I masked off the leaves and sprayed water onto the embossed rose image and then added a couple of drops of three shades of pink re-inker and allowed it to pool where it wanted. Once that was dry I covered the rose and repeat the process on the  leaves with two shades of green re-inker.

Once that was dry I edged the card panel using a sponge and green ink. I also used the green ink to stamp the two sentiments I had chosen.

 I adhered the card panel to a pink mat and adhered that to my base card. Finally I added a die cut butterfly that was floating about on my desk. I left the inside of the card totally blank so I could write personal message.

That's about it for this one...Until next time
Cxx

Friday 5 February 2016

Birthday Bunch

This pretty birthday bouquet was made using the new Grateful Bunch stamp set and coordinating  punch

I stamped the leaves once and snipped into them to make a shorter double stem and I added punched flowers in three sizes which were stamped in crushed curry and tangelo twist inks. A couple of the flowers were adhered to the base card and the remainder were popped up with dimensionals.

A couple of basic pearls were added to the centres of the smaller flowers and a cut bow finished it off.

A simple sentiment along with a green mat to frame the whole thing, completed the card.

Until next time
Cxx


Tuesday 2 February 2016

Balloon Celebration

This is the second of the two balloon themed sets and personally I love them both equally.

I made this card pretty much as soon as I got my eager mitts on this stamp set (when the spring summer catalogue went live,) but because it was for a friend's birthday I was not able to share it ...until now.

For this card I stamped the balloons on separate card and used the matching balloon punch. I adhered a couple to the base card panel and others I popped up on dimensionals. Although the set comes with a strings stamp,  I used the Just for you wording from the SAB free Botanicals for You set,  and so I was a bit space limited and so chose to use the metallic silver thread instead and cut a bow from matching card  to join the ends.

I think there are going to be a lot of balloons featuring in my cards and projects this year.

Until next time, take care
Cxx


P.S. The balloon punch comes separately or as a bundle saving 15% off individual prices. It also co-ordinates with the balloon builder set and ssh don't tell anyone but it may coordinate with at least one more upcoming set in the not too distant future... and of course you can simply punch balloons out of designer series paper and cardstock too.


Saturday 30 January 2016

Balloon Builder Birthday

I am loving the two balloon sets in the Spring Summer catalogue and can't decide if I have a favourite.

 This is the Balloon Builder set and I used it for this quick and simple birthday card that I needed in a hurry.

The mix of sizes in the balloon make it easy to quickly build the image you want and stamping repeatedly without re-inking  the stamp allows for the depth and shade variations.

I stamped this onto shimmery card for the extra sheen, using strawberry slush ink and then used a darker mat underneath.

For the sentiment greeting I used the Happy Birthday, Everyone stamp set.

That its for now.. until next time

Cxx

Tuesday 19 January 2016

In the Meadow

In recent years I have become a huge fan of the nature inspired stamp sets with animals and scenery. I still have every one I bought  even after some retired because I continue to use them often.

  In the Meadow is another lovely addition to my collection and this morning I have been playing around with this set.

The first thing I did was stamped and fussy cut each image to use  as a mask in scene building. I keep these tacked to the case lid with the stamps so they are ready when I need them.


For the first sample (above) I triple stamped the mountains and kept the rest of the scene as grassland with the saplings and deer in the foreground.

In the second sample (left) I used the same basic layout but added some pale water and edged it with sand  to make a divide between the grassland in the foreground and the mountains in the background.

In both samples I used darker shading on the closest range of mountains and lighter on the farthest most range to accentuate distance.


For my final sample I decided to try stamping on a piece of linen card I had sitting on my desk form another project. The linen texture card gives a whole difference result - especially in terms of how the card takes the colour. The lines of the stamped images are  much more defined too.

On this sample I changed the scenery composition slightly and added more water.

This was just my first attempts at playing around with this set. I already have in mind to use the scenery to build a scene for the 'airplane' from The Sky's the Limit  SAB stamp set...but that is for another day.

Until next time, take care
Cxx

Saturday 16 January 2016

Rose Wonder

I thought I would just share with you a few cards I have made with this set. For each of the cards I have used the same basic design but wanted to show the very different results you can get...


A couple of days ago I shared this one... where I stamped and  then coloured the image and added the die cut overlay over the top which gives a raised  dimension detail to the card.


Now on this one I stamped the image in black ink. I then very roughly coloured using watercolour crayons. Once I had the basic outline colours down , I gave the image a quick spritz with water and gently blended the colours out across the whole image.


For this next card I  took an off cut piece of very vanilla card and then I die cut the rose and leaves from plain white card and used it as a stencil. I sprayed the colour through the stencil and once it was dry I lifted the die cut overlay and set aside.  I fussy cut the stamped and stencilled image and adhered it to the front of a diagonally cut card base. I cut another piece of very vanilla card, stamped the sentiment in the top corner, inked the edges with a sponge and adhered it to the inside of the blackberry bliss card base.


And finally, in the spirit of not wanting to waste anything tyat can be used on a project , I took the die cut that I used as a stencil and adhered it to the front of a card and added an embossed sentiment to the top corner. I added a few dots with a versamark pen and clear embossed those in the space to complete this very simple Thank you card


The thing that impresses me so much about this bundled set is that I have only used one floral stamped image and one die from the set and there are so many more  in each...and I haven't even begun to cut into the die cuts and develop the cards that way. There are just so many possibilities with this set and I really think my husband made a brilliant choice with this one.

There are sure to be more of these to follow. Until next time, take care
Cxx

Thursday 14 January 2016

The Sky's the Limit

Today I thought I would share the sale-a-bration freebie my husband chose for me. This one is a limited time product and only available until the 15th February , so if you want it, please don't miss out.

The vintage plane is a great image and really easy to cut out...all the fiddly detail is inside!

I needed to make this card really quickly and so grabbed  a retired embossing folder (sorry, no longer available oops!)  but the stamp set does come with cloud stamps and I will do other cards using this set  with a variety of background options.

There are some great wording stamps with this set and the fonts are really classy. As this was a birthday card and I want the recipient to have an exhilarating day, I adhered one of the planes upside down.... They loved it.

More soon... until next time,

Cxx

Tuesday 12 January 2016

New Year, new catalogue, time to sale-a-brate

Life got in the way of creativity last year, but now we have a New Year and a fresh page to fill every day... and I plan to make the most of it.

As demonstrators we get to preorder  goodies before any new catalogue is released, but this time round circumstances had me waiting like everyone else...but my first lot of goodies came on Friday and I have been busy setting up my stamps and trying them all out.

I found it seriously hard to choose what  to buy and so I decided I  would let my husband pick for me.  To be honest I knew it wasn't that much of a risk because all the Stampin' Up! products are great and he has great taste anyway.

My first card shows that he chose the Rose Wonder stamp set bundled with the framelits. His reasons for this choice .. the pretty images and versatility of the matching dies and also the great sentiments that come with the set. For this card I stamped the rose and leaves by adding ink direct to stamp with my markers and then coloured them using ink and blender pen. I really liked the image as it was  when I stamped and coloured it, but of course I wanted to try the framelits too and so I cut the rose and leaves from a pearlescent cream card to compliment my very vanilla base card and adhered it over the top of the stamped image...and of course I loved that too.  Although the Rose Wonder set comes with lots of wonderful sentiments, he had also chosen the botanicals for you stamp set as one of the sale-a-bration freebies on my order and I was keen to try this out too. The finishing touches were the green and cream enamel dots left over from my Christmas crafting.

I enjoyed my first play with my new goodies and so far my husband has done a great job... What else did he order for me? That is for another post...

Until then, take care
Cxx