Sunday, 16 November 2014

Christmas Tag

It has been so long since my last entry that you might be forgiven for thinking I had fallen off the face of the planet... not so, I just took a tumble down the stairs and unfortunately hurt more than my pride. ...But I'm  happy to report I have finally  been able to get back in the craftroom for short periods  - which is a good thing because I was having serious withdrawals.


So my first offering for a very long time is this Christmas tag. I made it for a one to one swap I signed up for before my tumble - and it made a nice starter project.
I used chipboard as a base for my tag and I used  some distress paint as a base. For the front of the tag I  made a mask to sponge the moon and then  used the White Christmas set and stamped the snow (using white craft ink) , then the reindeer,which I coloured with soft brown sugar marker. I added the wording and stamped the word Joy in real red. Final touch was a quick dab on the reindeer's nose with the real red marker.

For the reverse of the tag I  used my favourite Visions of Santa stamp set. I stamped the  main wording panel using antique distress  stain and stamped the Santas around the edges, finally adding the Tis' the Season line in Memento black at the bottom. I coloured the Santas with blendabilities and chalk marker and added a smudge of shimmer here and there.


And that's it from me for today. I truly hope that normal crafty service will soon be resumed.
Until then take care
Christa   xx 

Thursday, 2 October 2014

Graduation - all about the hat!

I was recently asked if I could make a graduation card. The only remit was that it should                                    
 "be about the hat"

So armed with my supplies I set about making this cute  pop up mortar board card.

This was actually the first time I had made one of these and I was surprised at how simple it was to make with just some black and some white card, a scoring board and some adhesive.

For my card I opted to use some white cord so that the tassel would stand out. I made the tassel from a piece of scrap black card which I cut with the fringe scissors and rolled. I adhered it with sticky strip (red line tape) I punched a small hole, threaded the cord though and taped it on the back and used a black brad for extra security -  knowing that pretty much everyone who sees it will be tempted to touch the tassel!

On the base I stamped the greeting and the recipients name  but the sender also wanted to include a personal message and the thing with these types of cards is  that unlike a normal open fold card, there often isn't anywhere obvious to write a private message...so with that in mind I printed the message onto vellum and while it was fresh from the printer I added embossing powder and heat embossed it. I then cut it out and rolled it up to form a scroll which I  tied with some gold bakers twine. I fixed a small looped band of black card to the mortar board and slid the rolled scroll inside.... and the end result was a mortar board pop up with a graduation scroll message.

I was happy with the finished card and the customer was delighted too so i thought I would share this one today.

Until next time, take care

Christa   xx 

Wednesday, 1 October 2014

Super offer stock up and save


Fantastic offer from Stampin'Up with extra discounts across a range of products  with 20% off selected stamps, plus 15% off a whole range of basics like ink pads, A4 cardstock, envelopes and fast fuse adhesive.

Please be aware this is a time limited offer and only runs until 6 October 2014

If you want to take advantage of this offer to stock up and save then please get in touch or go to my online store where you can place an order at any time 24/7.

If you have any questions about this offer or any  products  or promotions or if I can help with anything else please do get in touch
Until next time
take care
Christa   xx 

Tuesday, 16 September 2014

Birthday Card


I was asked to make " a sort of  funny but I'm not sure what he likes" birthday card...and since don't know the recipient at all and so I can't help on that front, I played it safe with this slightly "cheesey"  card.

I used a kraft base with a decorative dots embossed white panel and yellow as the core colour and the cute little mouse from the life in the forest stamp set, some gorgeous new washi, the sentiment from  Just Sayin' set  was cut using word bubbles framelits and the stars were cut using the Little Pieces embosslits.

For the inside I used one of the image stamps from Giggle Greetings  which I stamped onto whisper white card, cut out and adhered to the inside of the card...and I teamed it with with one word stamps form Age Awareness photopolymer set.

A bit cheesey perhaps but I think it works...

Until next time, take care

Christa   xx 

Saturday, 13 September 2014

MDS to the rescue again

Yesterday I got a call with a last minute request to make a couple of cards that needed to be ready by tonight. This is the first time I have been asked for this type of card and so it was MDS to the rescue once again...


There was a very short amount of time to make these cards and as the two young people are part of the same family and the message  and wishes are the same for each, I kept the design the same and just changed the colours.


 The more I use MDS the more impressed I am with just how simple it is .  I can do the whole layout, change the colours, add elements so simply and can check it all before I save the project.  It is a far quicker process than if I stood in my craftroom surrounded by all my supplies...  and the end result - two cards ready for the young people who are about to set off to start their life adventures at University.

Of course MDS will never replace the pleasure of designing and making things from scratch in the usual way in my craftroom, but when time is short or the project is very specific, MDS is an extra tool available for me to use.

If you still haven't tried MDS you can download a trial version for free via my online store. You have nothing to lose and everything to gain. As always if you have any questions please do let me know

Until next time, take care

Christa   xx 

Thursday, 11 September 2014

Not sleeping on the job...honest

I haven't fallen asleep at my desk...but I did dislocate my elbow and tear a tendon which has made crafting a bit of a challenge...but with the help of  some fabulous ESP support (physio not psychic)  things are slowly settling..

Of course babies have no sense of timing and one in our family decided to come today -  a week earlier than expected...and so  I say a hearty Thank Goodness for MDS!  

Using MDS I was able to design, print and assemble this cute baby card today and all without too much strain on my poorly arm. I printed out the main panel already sized to fit my card base and I also printed the blocks, teddy and onesie a second time, cut them out and popped them on the card with dimensionals. A couple of basic rhinestones and it was good to go.

A pretty pink card for a beautiful baby girl.

If you haven't tried MDS yet, what are you waiting for? It proved a life saver for me today and you can try it for free. If you'd like to know just drop me a line.

Until next time,

Christa   xx 


Friday, 29 August 2014

Woo Hoo...


The new 2014 Holiday Seasonal catalogue from Stampin' Up! is live ...and if you are already one of my customers your complimentary copy, along with the little owl card, is already winging its way to you (if it hasn't arrived already).

The new holiday catalogue has 51 pages and is  filled with project ideas and details of the products used to make them.

As you'd expect there is everything you might need for cards, gift tags, treat holders, gift wrapping, table and home decorations and more... there is something to suit all tastes.


Now this picture shows  MY copy ... already well thumbed and you will notice I wrote my name on it ... what you can't see from this picture is that it also has my wishlist and project ideas notes inside
If you would like to get your own copy please drop me a line and I will get one in the post to you straight away.

Alternatively - or while you are waiting  for your copy to arrive in the mail -  you may prefer to view it on line where you can also download an electronic copy  please go HERE

Over the next few days I hope to share some projects made with products from the new catalogue....but as always if you have any questions about any of the products or promotions or you would like to know more please do get in touch.


Until next take, take care
Christa   xx 

Saturday, 23 August 2014

Let Your Hair Down

 In my previous post I shared the swap card I made on the cards for men theme ....but there was a spot left over in another group so I  made this funny card using the hostess set  called Let Your Hair Down which has 5 styled sentiments

I will admit the inspiration for this came at the end of a crafting session and from the disaster zone that was my work bench. I had been using the fringe scissors on a garden themed card and had some 'grass' fringes  left over. ...and I thought  hair!  I thought green hair might be overkill, but once I had the basic idea down I set too with the black card and gave him a retro  hairdo.

There are always punched circles on my desk (I hate waste & so have small press seal bags of punch-outs ready for when I just need to grab and go) so the eyes were a simple punch n stick with some white gel pen to add a little gleam. I made bright bow ties from some embossed yellow card (from a previous project) & my little hair card was born...

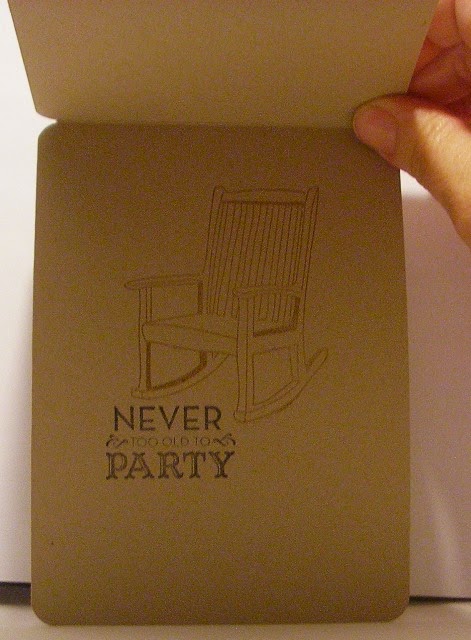
I think this could make a great "punny"card for a teenage son...with the addition of the words son and...(heir)...  but for this one I decided to use the rocking chair image (You Rock stamp set)  inside the card,  along with another of the sentiment stamps from the Let Your Hair Down hostess set ... and this one says Never too old to Party!

This one also got the husband seal of approval... in fact I got the giggle seal of approval and he kept coming back and looking at it ...so I am guessing that would make it a hit!

It was a fun card to make and a great way of using up some of the product left on my desk after I'd finished making other projects.

As always if you have any questions about the process or the products or anything else that I can help with please do get in touch.

Until next time, take care,

Christa   xx 

Friday, 22 August 2014

One for the Guys...


 I have been taking part in regular swaps with a small group of  UK demonstrators and this month we had men in mind...

I know many people say they find ideas for male cards  difficult but I really like the challenge.

 For this card I used Indigo Island for my base card with Maritime Designer Paper  for the lower half.  I stamped the ship from Traveller stamp set, punched it out and offset it against a punched circle of crushed curry card. I used a sponge to ink the bottom of the image with coastal cabana ink to blend it with the paper. Although the flags are a part of Sea Street stamp set,  the flags at the top were cut from a sheet of the Maritime paper. The Happy Birthday sentiment is from Bloom with Hope hostess set.

This card got the husband seal of approval so I guess he is one guy who would be happy to receive this card.

As always if you have any questions about any products or processes please do get in touch

Until next time, take care

Christa   xx 

Friday, 1 August 2014

Big Shot Bundles

Latest offer from Stampin' Up!                                                                                                                              

 Buy a Big Shot between now and the 31st August and choose any of these fabulous bundles for FREE! (My favourite price!

There are 5 stamp sets and coordinating framelits bundles to choose from, so there is sure to be something for everyone....so if you were thinking of buying a Big Shot, now might be the perfect time...

If its on your wishlist for later, you could always suggest to Santa that he might want to get a head start on Xmas shopping this year to take advantage of the GREAT offer...

As always if you have any questions about this or any other offers or products please do get in touch
Until next time, take care

Christa   xx 


Wednesday, 30 July 2014

I Love Lace

I will admit that I overlooked it on my excited forays through the new annual  catalogue, but once the new stuff excitement settled a bit, I  realised  had to have it...and now its here. I Love Lace...
Its the gorgeous new lace background stamp on page 175.

It arrived in the same package as my new blendabilities  and I spent a very happy hour colouring blended bloom images  in each of the blendies colours - and two flowers I coloured in combinations just to see what would happen..and because I can!

Once I had coloured and cut out the blooms it made sense to use them right away and as the matching ink colours were right there on my desk I grabbed I Love Lace and set to work. Just minutes later and I had this cute little card completed.

The base card is baked brown sugar, the ink and blendies used were calypso coral. I used the owl punch and a scrap of gumball green card off my desk  for the leaves and  stamped the sentiment from Flower patch set in Mossy Meadow. The bloom itself is popped up on dimensionals. I kept this very simple but you could of course add other elements to bling it up if you wanted...and because you can!

 I chose to get this stamp in wood mount because I personally find background stamps are easier to work with in wood - I often lay the block stamp side up and place the card on the stamp and apply even pressure to the whole stamp using a brayer or sometimes I use the flat edge of my metal non slip ruler. It gets pretty much perfect results every time... and when I do take stamp to card, I find having the wood block gives me a solid base to apply the right amount of pressure needed to make sure the whole image comes out cleanly with no blurring.

I just know that this lace background stamp is going to prove really versatile and I expect to be using it in a lot of projects over the coming weeks.

Until next time, take care


Christa   xx

Saturday, 26 July 2014

ILWS Blog Hop

Its that time again...when a group of us demos get together for a little blog hop...this time to celebrate some of the fabulous products in the new annual catalogue.

The hop starts with Laura and if you are following along in order you should have arrived here from Sarah's. If you get lost along the way there is a full list of links at the end of this post.


I have been sharing projects almost every day since the catalogue was launched because I have been trying out as many fabulous new products as I can...and my favourites are probably obvious, but this hop I wanted to share something a little different  from my recent shares...


A couple of weeks ago I  went on a one day jewellery workshop and came away with some really pretty pieces of beaded jewellery which I plan to gift to someone special, so I thought I would start with a gift box.

 I began with a kraft gift box and the new TYPESET designer series paper. This is amazing! It is intentionally thinner than the usual papers and has almost a silky feel. I choose the plain text option because I wanted to stamp over it and colour with blendabilities. 


The four sides and the top I covered with the typeset designer paper which was stamped using the amazing Bloom With Hope hostess set, coloured and sponge inked. 

On the lid I added crystal effects to the centre of the stamped flowers.

 I added a stamped panel to the inside of the lid but because of the shape of the box flaps I decided to stamp direct to the card and then sponge ink over. 


I chose blackberry bliss and lost lagoon blendabilities because the beads I used in the jewellery workshop were in a similar colour palette and being a Stampin' Up! demo I love to colour coordinate everything...and because they are my current favourite colours of course!


I really went to town on the box and left no area untouched. I lined the bottom of the box with blackberry bliss cardstock and I used the same on the base of the box and as a mat on the lid. 


But of course no gift would be complete with a card to go with it and I used a blackberry bliss base with the typeset paper stamped and coloured to match the box. I added a band of blackberry bliss stain ribbon and I made a little detachable flower brooch in the same style and I sealed it with crystal effects - because I put it on really thick for an enamel effect it took ages to dry and I was a little concerned it might not be dry in time to add it to the card.


A little blackberry bliss ink goes a very long way and so while it was on my desk - and my fingers -  I decided to make another card. Again with a blackberry bliss base but this time I used the Choose Happiness stamp set and stamped it randomly onto a piece of kraft card I added some more of that gorgeous ribbon and made a faux buckle and added a rhinestone. I stamped the greeting onto kraft card, punched it and sponged the edges before popping it onto a blackberry bliss punched scallop circle using dimensionals.


As a complete contrast I used the Choose Happiness stamp set in a similar fashion but in neutral tones. For this card I used a crumb cake card base. I stamped the flower image with crumb cake ink onto whisper white and embossed it with clear embossing powder. Once that was dry I went back in with a crumb cake marker and I highlighted a couple of areas and added more clear embossing powder to give a little more depth. I made a banner with kraft card, burlap ribbon and chevron ribbon and added a candy dot brad. I stamped the greeting in white ink onto kraft paper and I heat embossed it. I went over the whole thing with baked brown sugar ink for an emboss resist effect. I cut the panel using the framelits labels dies and popped it up with dimensionals.


That's it from me for now.... The next stop on the hop is Jo's blog where she has something fabulous to share with you.


Thanks so much for dropping by, enjoy the rest of the hop.


Christa   xx


Full hop list...just in case

1. Laura Mackie - www.lauramackie.co.uk
2. Sarah Keerie - www.esellek.com
3. Christa - http://serendipity-stamping.blogspot.co.uk/  YOU ARE HERE
4. Jo - www.jo-joscraftyblog.blogspot.co.uk
5. Sandra Roberts - www.kraftybiker.blogspot.com
6. Janneke - http://jannekedejong70.blogspot.nl/
7. Lorraine - http://www.thestampingrove.co.uk

Friday, 25 July 2014

Keeping it simple

I know I've  already said how much  I love the Kinda Eclectic stamp set....well I love it again today... and since it was on my desk already I decided to use it to make this really quick and simple birthday card.

I used the ray stamp from the set in a variety of colours, teaming it with the Happy Birthday greeting from Sassy Salutations set onto whisper white cardstock. I sponged the edges with some blackberry bliss ink, adhered the whisper white panel to a blackberry bliss card base and added a couple of basic rhinestones for a little glitz.

 It really did take just a few minutes to put this card together and I love that this is just another of the many ways to use this fabulous new set... and I am certain there will lots more to follow.

I am taking part in a blog hop on Saturday and I hope that you will join us

Until next time, take care


Christa   xx

Wednesday, 23 July 2014

A Little Kindness


I really LOVE the Kinda Eclectic stamp set and so when I signed up for a swap it was an obvious choice

For this one I masked off a central space before layering up the leaves and the rays stamps from the set. Then I removed the mask and stamped the sentiment into that central space.

I decided I wanted to use all of the latest in-colours on this card and with the addition of sponged edges and the punched butterfly I did it.

I added a few of the really cute sequins just to finish it off. As the card base is blackberry bliss I included a panel inside which I stamped and sponge inked to match.

Until next time, take care


Christa   xx

Tuesday, 22 July 2014

Happy Birthday Sunshine


Today is my sister-in-law's birthday and this is her bright and sunny card, which I felt was rather appropriate for the middle of a heatwave. It was made in consultation with her brother - my husband ...I will make a crafter out of him yet or I'll die trying!

I used Kinda Eclectic and Ray of Sunshine stamp sets for this one along with the banner , butterfly  and circle punches and then added rhinestones for a little birthday bling.

I hope that when she opens it it will make her smile

Until,next time, take care


Christa   xx

Friday, 18 July 2014

Love you...

 I am loving the new masks and today I played around with the hearts mask using strawberry slush ink onto very vanilla cardstock.
When I looked at the placement of the mask I noticed that the hearts are graduated in size and density and so I decided that I would try for an Ombre effect with my sponging.

I loaded up my sponge and started at the bottom and worked my way up to the top. Then I went back over the bottom section until I had the kind of coverage I wanted. I think it worked out okay.

I used pictogram punches stamp set (for the sentiment and the vase image) the new and rather beautiful Venetian Crochet trim, labels framelits & chalk talk framelits and the project life corner rounder punch.

For the 'flowers' to top the stamped stems I used punched hearts from another project where I had used the hearts border punch...I do so love that the punch outs are usable and I have popped the punch outs into little baggies ready for when I need a teeny heart or two.

To finish the card I ink all the edges and in the card above I added three mini pearls to the heart flowers...but in the card on the left I  went on to add a large pearl to the centre of the heart in the sentiment panel as well.

I am melting in this heatwave - it was a steamy 38C in my craftroom today and I could not spend long in there at all. It was like a sauna.

The thunder is crashing about now but there is no relief from the 84% humidity as yet... I am hoping for cooler times ahead.

until next time, take care

Christa   xx

You're a Star

I have been working on a few projects which I can't actually share just yet - they need to get to where they are going first otherwise the surprise might be spoiled....

but yesterday I heard news that a special little boy did a really good job taking the lead role in his school play...which this time happened to be a musical and according to his sister he absolutely nailed it...

So I wanted to send him a quick card to let him know that although we couldn't be there to see him perform, we know what a little star he is...

and with that in mind out came the new stars mask... and I was totally amazed at how easy it as to use. Just a few minutes with a sponge and some ink and I had covered an entire A4 sheet in random stars. The You're a Star stamp form pictogram punches and one of the cute sequins were all it took to make this quick and easy card which will hopefully put a smile on someone's face.

Until next time, take care


Christa   xx

Wednesday, 16 July 2014

Rock Star

A really quick card from me today using the You Rock single stamp .

I almost always end up falling in love with all the single stamps in each catalogue but this year this particular one really called out to me... I just love the humorous possibilities

I stamped a kraft card base with the hardwood background stamp using baked brown sugar ink and used the same colour marker for the rocking chair. I took the crushed curry from the image mat and used that shade of ink to stamp the word star (from the pictogram punches set...more from that one very soon)  and I cut the word STAR out using the project life framelits. I inked the edges and added a punched star from gold glitter card and used a glue dot to secure that over the stamped star... Then I just popped the image and the word panel onto the kraft base with dimensionals and job done.

Until next time, take care

Christa   xx

Monday, 14 July 2014

Blooming...

I was asked to make a daughter birthday card and since I am still working my way through the new products I was delighted to find that the Bloom with Hope  (Hostess stamp set) comes with a Happy Birthday greeting too.

I used blackberry bliss and white for this dramatic card.  I chose one of the floral images and I used direct to stamp markers and blender pen on each image which I then cut by hand. I ink edged a couple of the flower and the rest I cut with a white edge so they would stand out against the  blackberry background.  I used labels framelits in white and blackberry and I used white gel pen for the faux stitching. I then arranged the flowers into a bouquet, (which was the tricky part for me because I have always been rubbish at any kind of flower arranging) with the background flowers  flat to the card and the front flowers  popped on dimensionals.

I layered blackberry bliss stitched  satin ribbon over a wider whisper white satin ribbon and secured them behind before adhering the embossed panel to a scalloped card front. I added a tiny bit of sparkle to the front flowers and popped on some pearls to finish it off.

That's it from me for now, Until next time, take care.


Christa   xx


Sunday, 13 July 2014

About the label

No, this is not a post about labels - although with this stamp set it could easily be....so watch this space for a post that is really about labels coming soon...

The stamp set I am trying out today is called About the Label and it is a really cute set with a bag, an envelope and a jar stamps and lots of teeny labels to go with them. The labels come in three shapes and there is a handy little labels punch set to go with this and make my life (and yours) so much easier.  The bag , envelope and jar need to be hand cut but they are  simple shapes and quick and easy  to do.

This is really a multi product card and it gave me a chance to try out lots of my goodies on one project. For this card I cut some 12x12 kraft card and I used one of the stars from the new pictogram punches set to randomly stamp a background. I used the project life corner rounder punch which gives a slightly rounder edge than the normal corner punch and I sponged the edges with blackberry bliss ink. I stamped the images and mini labels using the blackberry bliss ink and I cut and punched them all out. I took a strip of crushed curry cardstock and used the (sadly  retired) scallop edge punch on both sides. I am so sorry to see it go but I own it so I'll use it.  I cut a piece of rich razzleberry card and used the new hearts border punch along the top. I LOVE this heart punch not only because it is so cute but also because when you punch it gives you hearts instead of waste and you can use these cute little hearts on your projects. Once I had adhered the layers of card to the card front I adhered the bags and envelope and popped the labels on with dimensionals....and the card is done.

If you have any questions about any of the products mentioned or you would like to order products or maybe join the Stampin' Up! team then  please do get in touch

Until next time, take care

Christa   xx